Home » General Discussions » General Discussion » Tutorial: How to insert a C&C95 Map into Command & Conquer3D 1999
| Tutorial: How to insert a C&C95 Map into Command & Conquer3D 1999 [message #492118] |
Sun, 02 April 2017 18:55  |
 |
 Kamuix
Messages: 1247
Registered: May 2005
Location: Ontario, Canada
Karma: 0
|
General (1 Star) |
|
|
Thanks to the lead programmer at http://www.goldeneyevault.com and to Nyerguds it is now possible to add your Command & Conquer 1995 map to the four years newer Command & Conquer 1999 that was redone in 3D for the Nintendo 64.
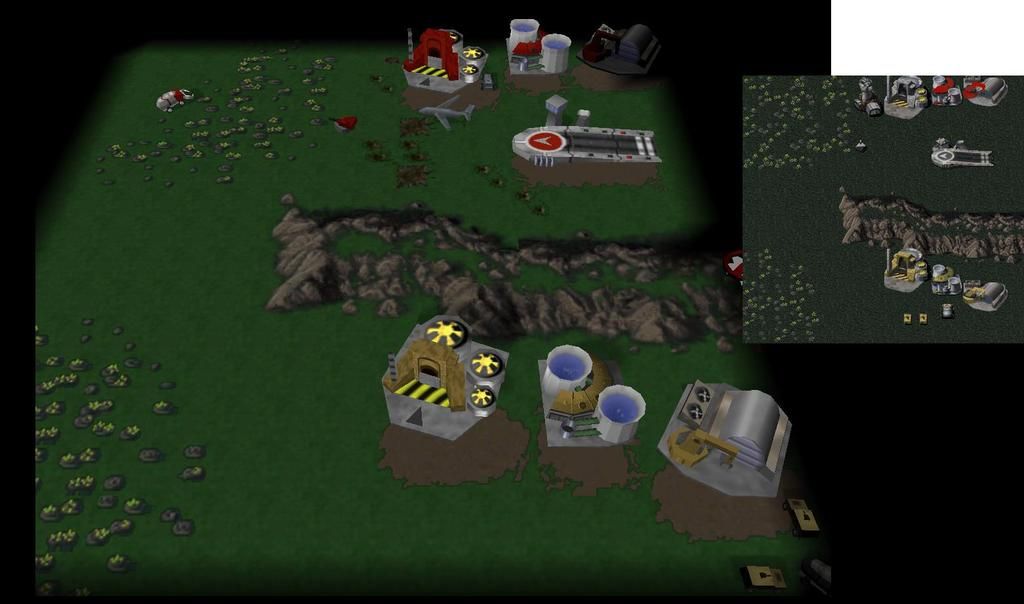
To start off I'll note that i was surprised to learn that the file formats for the INI are the exact same! And thanks to a tool that Nyerguds has made up for us we can easily convert the .bin maps to .map (which is what C&C64 uses instead of the bin). There's also an additional file for maps that a .IMG extension and is responsible for the 3D terrain effect seen on the C&C64 that you'll see in the images below. I'll also note that it's not essential to have the .IMG file to play your map you just won't have the 3D terrain effect. In fact, it's not even essential that you have the .map (bin) file either, so you can play maps that are clear of terrain other than trees/tiberium/buildings/units/triggers etc. I'm not an experienced tutorial writer, so bear with me!
Also, before I start i want to say that almost all the Covert Operations missions are in the Command & Conquer '64 game/ROM, but are not playable unless you hex edit the ROM (which is easy to do, and I might actually show you how to do that here as well). For more information on the hidden secrets of the N64 game, read here:
https://tcrf.net/Command_and_Conquer_(Nintendo_64) (written mostly by Nyerguds)
To start off, you'll need these tools to do this awesome process:
First the main tool called Universal N64 Compressor:
http://www.goldeneyevault.com/viewfile.php?id=213
A Command & Conquer 64 ROM: (I'm using the US version)
http://romhustler.net/rom/n64/command-conquer-1
Project 64 version 1.7 or above: (Right now I prefer 1.7)
http://www.pj64-emu.com/downloads/project64/binaries/
Nyerguds's PC<->N64 map converter:
http://nyerguds.arsaneus-design.com/project_stuff/2013/CnC64MapConverter/release / (Take the latest version; the one at the bottom)
RTool 64: (this is v2.07. Some newer v3 betas are available in the same folder)
http://n64.icequake.net/mirror/www.dextrose.com/files/n64/transfer_tools/bb-rt20 7.zip
HxD Hex Editor:
http://download.cnet.com/HxD-Hex-Editor/3000-2352_4-10891068.html
The reason why I listed Project 64 was because It's the only emulator that comes with the working Glide64 video plugin which is the only plugin that runs C&C64
properly. You could download the 1964-ultrafast emulator that overclocks the emulator which makes C&C64 not lag at all except the only problem is is that the video plugin it uses doesn't quite run it as well everything is dimmed for some reason but you can try it out if you want. Also i couldn't get the Glide64 with that emulator or any other emulator. download 1964-ultrafast here: www.emulation64.com/files/info/944/1964-ultrafast.html/
Before we open the Universal De compressor we'll want to open Nyerguds's CnC64MapConverter so that we can convert your maps bin file to a .map file. When you open it, it should look like this:
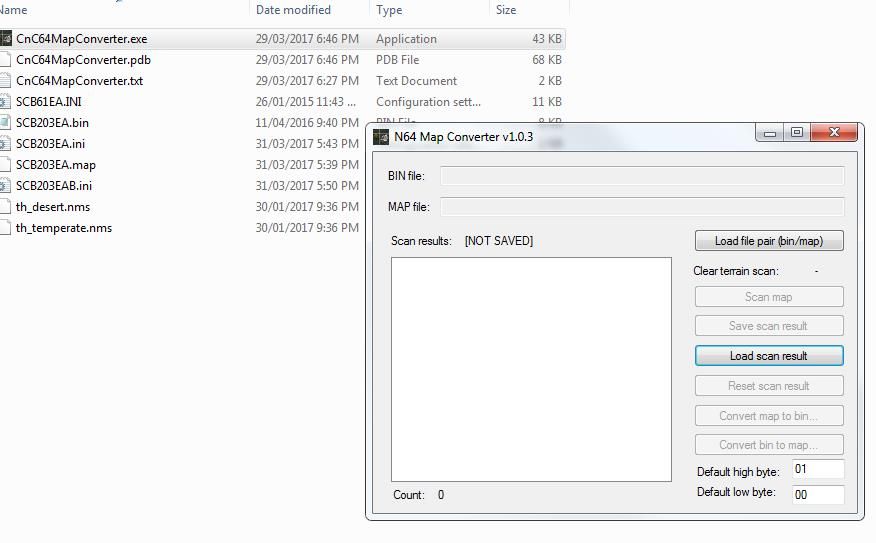
Now click 'load scan result' and select one of the included .nms files. You'll see there is one for desert and one for temperate. so click the correct one for the map you have. After hitting OK, you'll see some stuff on the list which you usually don't have to get involved with.
The "default high byte" and "default low byte" are used to fill in cells that can't be converted. If you leave them empty, they'll automatically use the right bytes for 'clear terrain', so just leave them empty. (They're filled in on the image because that's an older version of the converter)
Now you're ready to hit 'Convert bin to map' and select your bin file. It will then ask where you want to save your map... probably in the same place, so there you go, that's done! Now moving on to the decompressor program.
Now you'll want to extract Universal N64 Compressor somewhere, and have your C&C64 US ROM ready, preferably in an empty folder, so, yes, create a folder and put your C&C64 ROM in that folder first. You'll see why in a moment. Now open GEDecompressor.exe and you'll see where you can select a range of games, so select Command & Conquer of course:
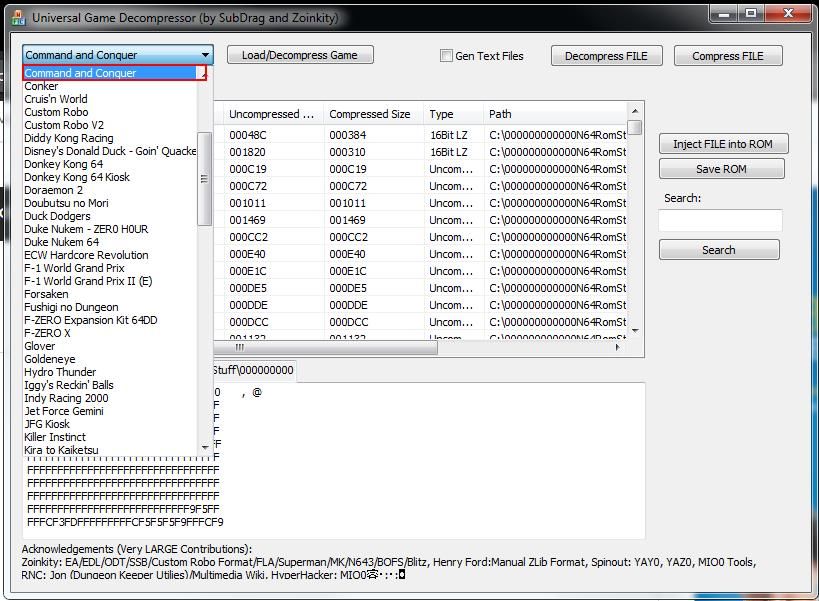
After that, just next to that, click 'Load/decompress game', go to the folder you created and select your C&C ROM. Now you'll see a loading bar as a bunch of files pour down the menu screen. Wait for it to finish. When it's done, do this:
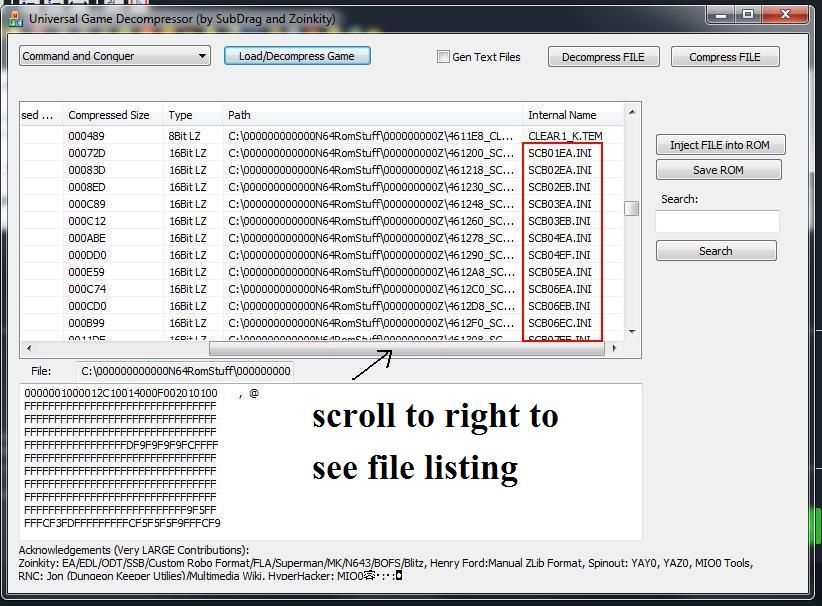
Scroll down until you reach the mission .ini files, and from there it's almost as simple as selecting the map file you want to replace with whichever map you want to insert there, except that there are size limits for each map, especially when dealing with the ini's. Luckily when you hit "Inject file into ROM", if the file you are trying to insert is bigger than the file you're replacing it with, it will warn you if you are replacing a file that is smaller than the one you're inserting.
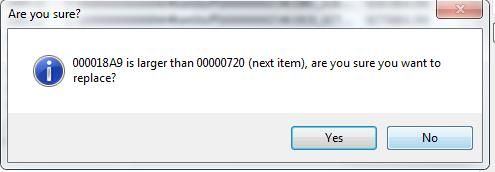
So if that comes up you're usually best to hit 'no' and find another file to replace that has enough room for the map you're inserting, otherwise part of your map will get cut off and you'll find that out ingame.
Assuming you have a .ini and a .map to insert, once you have found slots to insert them in where there's no size problems, take note of which map filenames they were that you replaced. It's also important to note that the name of your map before you insert it doesn't matter, so your map that you are wanting to insert can be called anything like gdrhgsdfg.ini for example. The only filename you need to remember is the one you replaced. So let's say hypothetically you chose to replace scg15ea.ini with your ini and scb07ea.map with your map(bin) file (for future reference).
Now click 'save ROM' and save it somewhere, preferable outside the folder which is now littered with extracted files.
Now that your map is inserted we need to make it playable, so open the hex editor I linked you to (or any hex editor you may already have; should be similar enough) and open your N64 ROM that has the maps inserted. One thing you'll want to do is this: at the top, go to 'Search' and go down to 'Goto' and type in the address "20D4EA". It should bring you to a large list of map filenames seen here:
(You can expand your view to 48 which is what i use to make it easier to see)
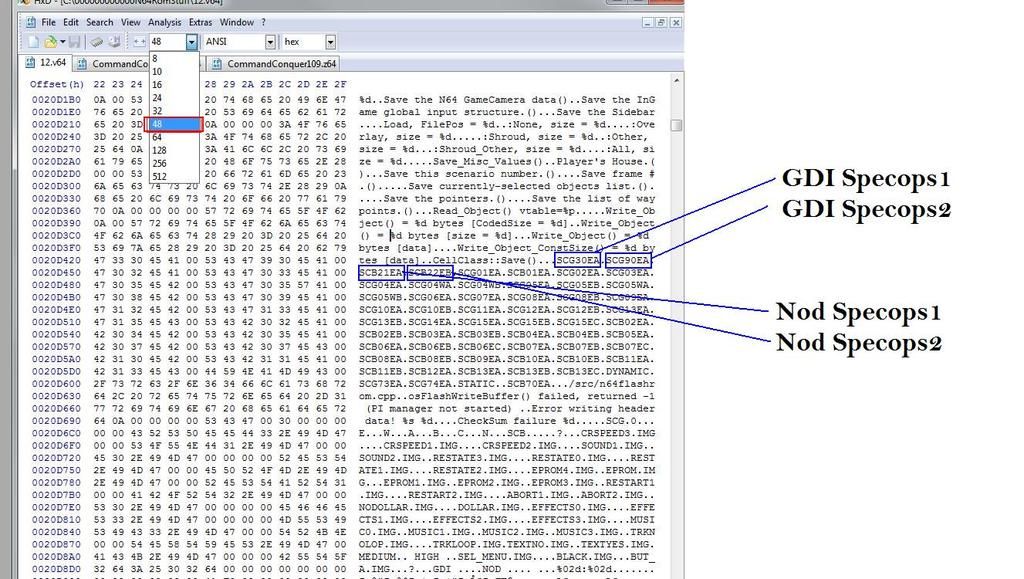
So let's say your mission is a Nod mission, so let's use the slot that's for NodSpecOps1, so change 'SCB21EA' to 'SCB45EA' for example, since we know that filename is not used. If it's a GDI mission you have to change 'SCG30EA' to 'SCG45EA'. Note that the number 45 in your filename dictates the build level. so yes the build level option in your ini file is ignored in the N64C&C for some reason. so all filename numbers that are 15 and above are buildlevel max which is 15 (Construction yard vehicle buildable)
It's also important to note that the G and the B in the map filenames dictates whether or not you have a Nod or GDI sidebar menu, with yellow or red units. The minimap also changes: it gives desert terrain for Nod and temperate terrain for GDI. So if you insert a Nod map and call it 'SCG20EA' You'll be playing as nod but with a GDI sidebar, with yellow icons for the buildings/units 
Anyway, moving on, we need to get to the next list of filenames so we can line up the maps we inserted with the SCG/B45EA names we chose, so now under search click 'Goto' again and go to this address: "461449" you'll see a different list of filenames now, and my maps I've inserted are 'scg15ea.ini' and 'scb07ea.map', so we need to find those and rename them to the map filename we chose above, which was 'SCG45EA' (or 'SCB45EA'). So in this case, it should look like this for mine:
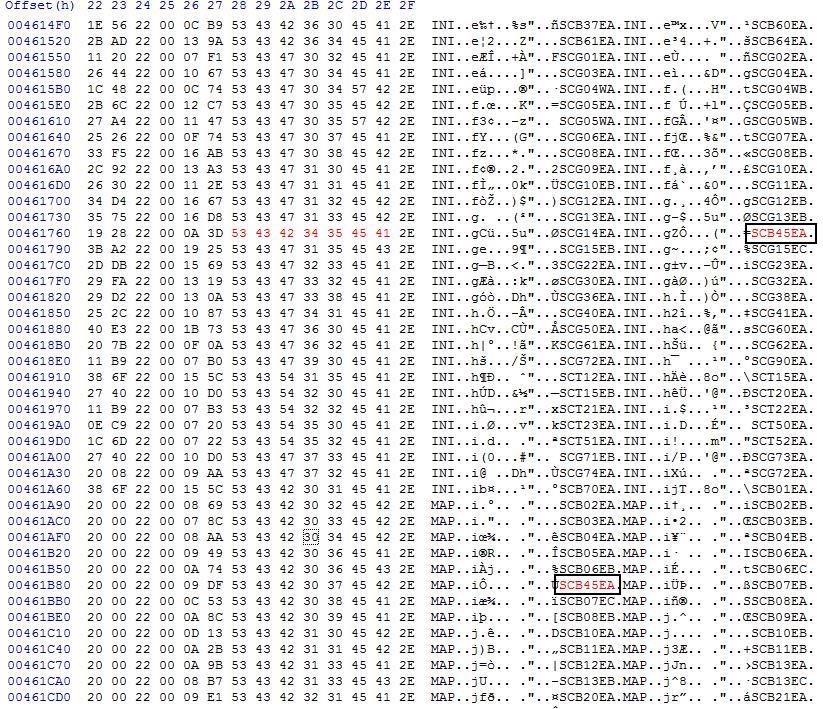
See how the slots where my maps were inserted are now changed to match our Special Ops slot and map name. Now all you have to do from your hex editor is save your ROM and load it up in Project64, go to the SpecOps slot you used and play it (or if you chose a mission map slot between 1-15 just go to that map and play).
Oh, one last thing in Project 64! Go to settings and change your video plugin to this Glide64 like this:
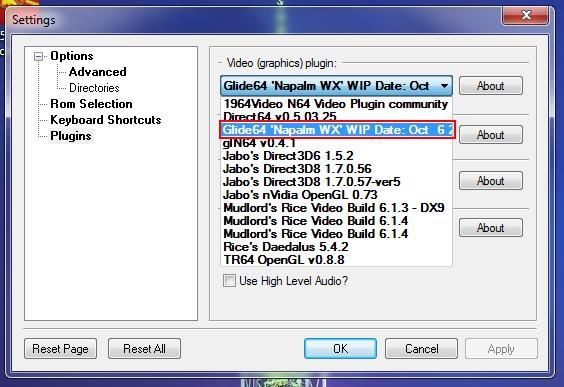
It runs the game almost perfectly, and all other video plugins seem to have problems.
There were more details i wanted to get into, especially with what you can do with the hex editor, so i may edit this tutorial in the future.
I hope I didn't miss anything and I hope i detailed everything well enough for people to follow. If you have any questions, feel free to PM me anytime if you happen to be confused about something. Cheers!
Here are some Pictures of Custom levels
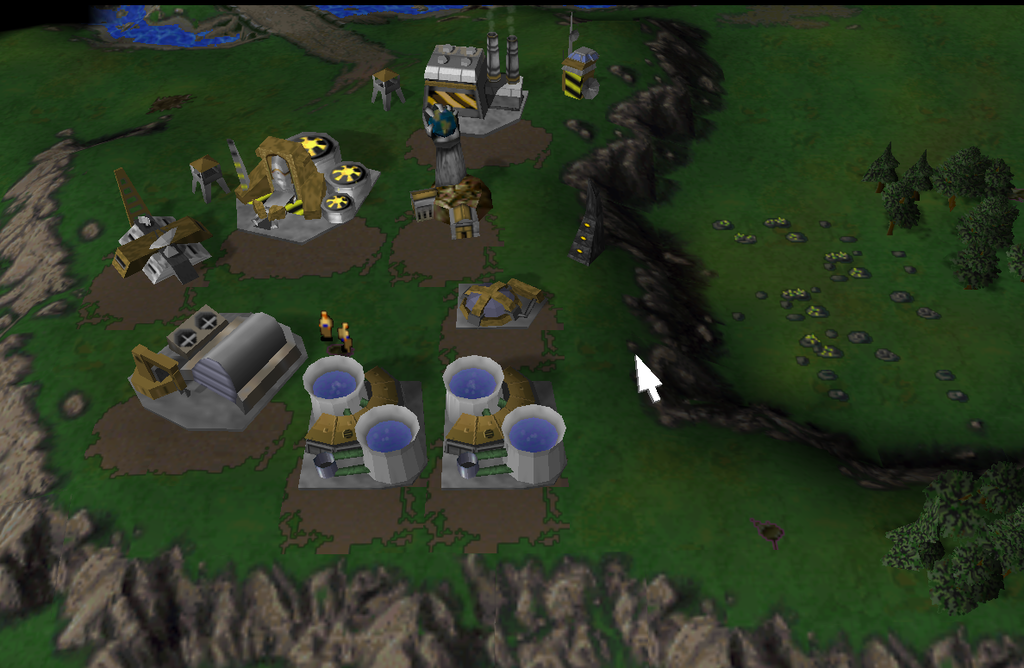
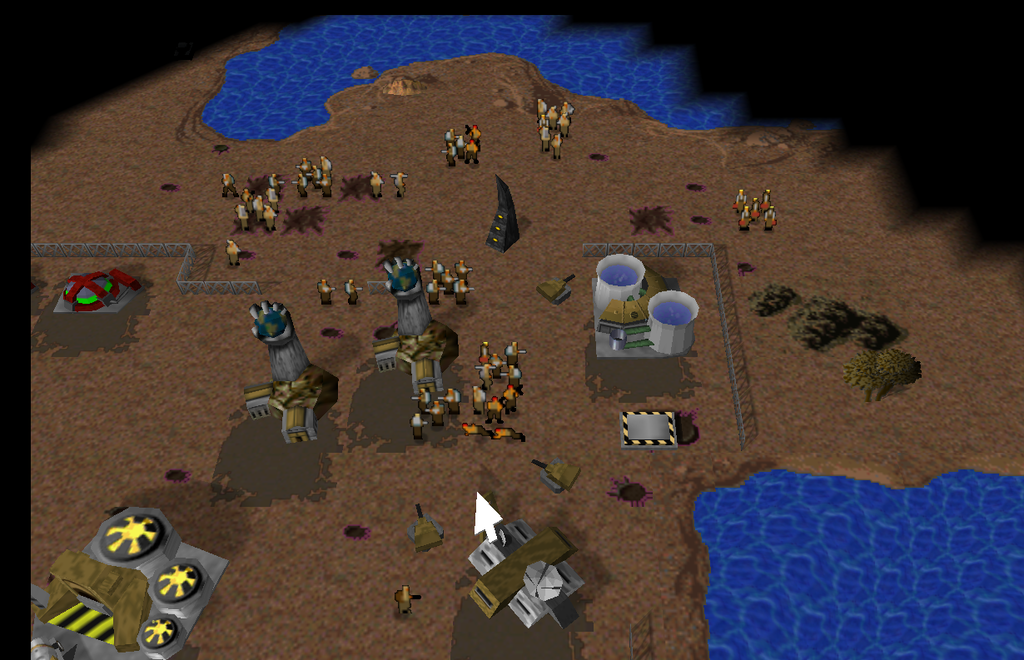
EDIT: If anyone has any questions feel free to message me or add me to skype through my profile information!
[Updated on: Mon, 03 April 2017 04:47] Report message to a moderator |
|
|
|
|
|
|
|
|
|
| Re: Tutorial: How to insert a C&C95 Map into Command & Conquer3D 1999 [message #492271 is a reply to message #492122] |
Fri, 21 April 2017 18:10  |
 |
 Kamuix
Messages: 1247
Registered: May 2005
Location: Ontario, Canada
Karma: 0
|
General (1 Star) |
|
|
| iRANian wrote on Wed, 05 April 2017 03:59 |
It's also possible to convert C&C95 maps to RA95, but you need to write the tooling for it. I got code for reading C&C95 and RA95 maps in C# on my github...just never bothered to write a converter.
|
At times i have wondered about the possibility of this because for a programmer it probably wouldn't be that hard to do what you're saying
|
|
|
|
Goto Forum:
Current Time: Mon Jan 26 12:48:43 MST 2026
Total time taken to generate the page: 0.00707 seconds
|


